
MILAMEMORIES
Thursday, December 30, 2010
Monday, December 27, 2010
Saturday, December 18, 2010
Christmas Invite


 Good Morning,
Hope everyone is having an awesome week!! Did you get your holiday shopping done yet? I am still buying presents for people, i am hoping to be done by Monday. The only presents i have are for my son, I have no idea what to get hubster. He said he doesn't know what he wants. So I need some ideas, what is everyone getting their husbands?
Alright now back to my project, i get side tracked so easily. LOL
So we had to create an invitation or tag for the SweetSassyDiva design team, but i want to do something original. So, i looked through my stash and saw this die by Tim Holtz, and thought how neat would it be to get in invitation like this to a holiday party. They can hang it up and it would be such a cute little decoration as well as a reminder for the party. Of course i had to use my new Stampin Up products. I am just in love with all of their products, especially the Shimmer paint in Champagne.
Recipie:
-Stampin UP Big Shot Die-Cut Machine - Item #113439
-Tim Holtz Hanging Sign Die
-Stampin Up Classic Ink Pads in Chocolate Chip (#100908), Early Espresso (#119670) and Crumb Cake (#121030)
-Stampin Up 5/8" Satin Ribbon in Real Red - Item #117286
-Stampin Up Hostess Set Clear Mount Afterthoughts Stamp set - Item #118388

 -Stampin Up Hostess Set Clear Mount Punch Potpourri Stamp Set - Item #120124
-Stampin Up Artistic Etchings - Clear-Mount Stamp - Item #120573

-Stampin Up 1/2 Inch Crochet Trim Chantilly - Item #118480
-Stampin Up On Board Long Board Chipboard - Item #114320
-Stampin Up Champagne Mist Shimmer Paint - Item #116806
 -Stampin Up Basic Pearls Jewel Accents - Item #119247
-Stampin Up Designer Series Paper Patterns Stack - Neutrals Collection - Item #117157
-Stampin Up Stamping Sponges - Item #101610
-Stampin Up Tombow Multi-Purpose Adhesive - Item #110755
-Stampin Up Whisper White Cardstock - Item #119952
So the first thing i did was cut out the chip board, along with my Designer Series Paper using the Big Shot and glued them on with the Tombow Multi glue. I took my sponges and inked the edges with the chocolate chip ink pad and then again with the espresso ink pad. I then took my whisper white cardstock and stamped the sentiment in Early Espresso. I again took a sponge and distressed the Whisper White cardstock with Crumb Cake Classic ink pad. Then I took an image from the Artistec Etchings Stamp set and used Crumb Cake ink pad to stamp it onto my sentiment, making an awesome background. I did the same thing with the crown, stamped it on whisper white cardstock with Early Espresso ink and then cut it out and put Gold Lame Smooch to accent some areas. For the bird i used the Punch Potpourri stamp set with Early Espresso Ink, except for this one I stamped it on designer series paper to get that awesome text background and sponged some crumb cake over that. I then put shimmer paint across my bird using a piece of sponge as well as my crown. Glued it all down and you are done!! Super easy!! On the back side of it you can put the information regarding the party.
Hope you like it!! If you are interested in purchasing any of the Stampin Up products i used please visit: http://www.stampinup.net/esuite/home/milamemories/
MilaSunday, December 5, 2010
Christmas Past Advent Calendar

Hello Everyone!!
Wow, these past few weeks have been super crazy around here! I am so excited for Christmas time, I wanted to make an advent calendar for my son that would hold a little car, not just candy (he get's enough candy from his grandmothers LOL), so i did not want to only give him chocolates everyday, so everyday he would open one little drawer and he would have a tiny present inside, I thought it would so exciting for him. This is my project for the SweetSassyDiva design team as well.
Here is how i made this advent calendar, if you have any questions, please feel free to leave a comment and i will answer them.
The first thing I did was layer the bottom piece of my patter paper on my 12 x 12 piece of chipboard. Then I put Rock Candy Distress Crackle Paint all over the image to give it a very nice shiny vintage feel. I glimmer misted all of the pattern paper with Old Lace glimmer mist.

Then I cut my chip board 3”W x 12”L pieces and then painted one side of each piece. I then used Modge Podge to glue the patterned paper onto the other side of the chipboard piece. I next put the box together using a hot glue gun, I marked how big I wanted the inside pieces (dividers that would hold my little drawers) to be and then cut those pieces and painted them as well. I did not put any pattern paper on them because you really can not see it when you open the drawers.


In this next picture I show you how I placed my dividers (I edged the dividers with Gold Ranger Aderondeck paint so that it would look nice once the drawers are open), I wanted to make sure that they fit my box.

This picture shows my box put all together including the dividers.

I used my Martha Stewart score board to make the drawers. The drawers are made out of the Graphic 45 Christmas Past pattern paper, then I cut out images from the collection and placed them on the drawers.

I used the Tim Holtz pattern paper for some of my numbers on the drawers. I really loved the way they looked, it is from one of the 6” x 6” Bingo sheets. I liked that they all looked kind of different, I just accented them with stickles and Diamond Dust.


The next thing I did was accent all of the drawers with some stickles so that each one would have some sparkle.
Recipe:
-Graphic 45 Christmas Past Deluxe Pattern Paper 12 x 12
-Medium Weight Chipboard
-Tattered Angels Old Lace Glimmer Mist
-Prima Lace
-Pearls
-Stickles (Various Colors)
-Tim Holtz Pattern Paper
Tell you what you think!!
Hugs,
Mila
Saturday, December 4, 2010
Thursday, November 25, 2010
Happy Haunting Christmas Frame

Hello Everyone,
This is my project for the SweetSassyDiva blog this week, if you haven't noticed already... I love making frames. I made this frame using the Happy Haunting Cricut cartridge. This is such a super easy and quick project. I used the 3M-Post It paper to cut out the base of the tree as well as the layers. Wow, I love this paper, it was such a breeze to put the layers of the tree together since i did not have to mess with gluing them down because the back side of the paper is sticky already. I just distressed the the layers with Tim Holtz distress ink and stuck them down. I put some flower soft on the tree to give it some extra texture and dimension. Hope you like!!
Recipe:
-Graphic 45 Pattern Paper
-Tim Holtz Distress Ink in Peeled Paint, Pine Needles, Vintage Photo and Walnut Stain.
-3M Post It Paper
-Prima Bling
-Flower Soft
-Stickles
-Cricut Cartridge Happy Hauntings and Christmas Solutions


Happy Thanksgiving Everyone!!
Hugs
Saturday, November 20, 2010
Seasons Greetings Frame Graphic 45


Hello Everyone! Hope you are having an awesome week. I made this cute Christmas Frame / Wall Hanging for the Cricut Monthly Challenge. I just love the way it came out, especially the Cheeky Christmas stamp from The Greeting Farms. This is a working frame that has an opening at the top so you can insert a photo of your family and then hang it up (or just leave it as is, which is what i am doing with this one, just as a home decor).
The SweetSassyDiva design team received some cardstock from 3M Post-It to try out and give reviews. I used some of it on this project and will most definitely be using it in future projects. It is an adhesive backed cardstock, so all of the tiny little pieces that we all hate gluing onto our projects (like eyes and mouths, etc.), we don't have to use glue anymore, we can directly take it from our mats to our projects without loosing any pieces (ok maybe it's just me that looses those tiny pieces LOL). How exciting is that!! It also works really well with the Cricut as well as the Sizzix Big Shot. I have used it three different ways in this project and will be showing you all sorts of different ways it can be used in the next few weeks. You can purchase the 3M Post-It paper at your local Joann's.
Recipe:
- Medium Weight Chipboard - 2 Pieces, one for the frame and another one for the back of the frame.
- Graphic 45 Christmas Past Deluxe Edition Paper
- I used the Sizzix Big Shot and the Baroque Die by Tim Holtz for the base of my frame, but you can also use your Cricut and a cute image that is similar from the Sentimentals Cricut Cartridge.
- Claudine Hellmuth Studio Paint in Modern Red
- Ranger Aderondeck Paint Dobber in Gold
- Ranger Diamond Stickles
- Christmas Solutions Cricut Cartridge
- Prima Flowers
- Prima Bling
- Prima Lace
- Provo Craft Swiss Dots Embossing Folder
- Green Felt
- Sizzix Flowers Die (to make the leaves shape)
- Tattered Angels Glimmer Mist
- Shimmer Modge Podge - Gold
- Copic Markers
- Post It Paper by 3M in White
- The Greeting Farms Cheeky Xmas Stamp
The first thing i did was cut out my frame with my Sizzix Big Shot and the Tim Holtz Baroque die, then I painted that with the Claudine Hellmuth paint and set a side to dry. In the mean time I worked on my title for the frame using my Expression and the Christmas Solutions cartridge (this was cut at 1"), I used the 3M Post-It paper in white and then i painted over it after i cut it out with the Gold Adirondack Dobber. I really love this paper, because i don't have to use glue with it (I hate adding glue to small pieces or letters, this is truly the perfect solution for that). Once the frame was dry, i covered it with Shimmer Modge Podge to make it sturdy and to give it a very nice finished look.
I glimmer misted my Prima flowers with Tattered Angels Glimmer Mist, used my Sizzix to cut out felt leaves for the flower, then embossed the felt to give it a nice dimension. Used my hot glue gun to put it all together and stuck it onto my frame.

I then started to work on my Xmas Cheeky girl with my copic markers. I used the white 3M Post it Paper on her as well. The reason i did this is because i wanted to add some glitter to the back of her, because i knew she would stick out a little bit and i did not want the back to just be plain white. So, i stamped her on the non sticky side and then once i was done coloring her in, i took the backing off and sprinkled some Martha Stewart glitter on the back. I am so loving this paper, you can do so much with it. I then finished her off with some Diamond stickles.


This frame would be a perfect gift for the holidays, I have actually made several different ones as gifts and on the back of each of them I have attached an envelope so that you can write a little note inside for the person, and then they can put little pictures or memorabila from the year in the envelope, maybe some journaling.

Thanks for looking!!
Mila
Monday, November 15, 2010


Hello Everyone!! I am the Designer on Pam's blog today, The Bug Bytes, make sure you check it out!!
I am here to share some Christmas cards I made for some friends. They are super quick and easy, I needed a way to make beautiful cards in no time, since I have so many projects going on right now. I used the Graphic 45 Christmas Past Collection, this collection is so gorgeous. I am doing layouts with it, cards, an Advent calendar, Christmas Ornaments, you guys need to check this collection out. The Advent Calendar should be up on my blog sometime later this week!! (Please visit Scrapyland.com for all supplies used today, including the Winter Frolic Cricut Cartridge).
I added some Prima flowers and bling along with some Stickles from Ranger. Next I cut out some sentiments from the Winter Frolic Cartridge and i was done. Enjoy!!
Thanks,
Mila
Wednesday, November 10, 2010

SweetSassyDiva - Week 3 - Visiting the Pumpkin Patch Layout


Recipe:
-October 31st Cricut Cartridge
-Smiley Cards Cricut Cartridge (Exclusive to Gypsy Owners)
-Graphic 45 Hallowe'en in Wonderland Paper Collection
-Recollections Halloween Border Strips from Michaels
-I-Rock Bling
This week we were supposed to use the Smiley Cards cartridge on a project of our choice. I still have not scrapped photos from last fall, so I thought I would use this opportunity to do that. As I was looking through this cartridge on my Gypsy I found that it has some great images for the holidays, it has pumpkins, snowmen, apples, a caramel apple and many more. I chose to use this very cute pumpkin as the center piece for my layout (I just love all of the emoticons on this cartridge). I also used the October 31st cartridge to cut out my title "Pumpkin Patch", and then just cut out some patterned paper from Graphic 45 Hallowe'en in Wonderland collection. I still have some scraps that I wanted to use, so i used them to mat my photos. Super easy and quick layout!!
For my layout I used a sketch that i saw on the Scrapyland Blog, Susan (blog keeper) has some of the best sketches, most of the time you are using more then one photo per layout and I just love that because I always have so many photos. Be sure to check them out when you get a chance, they are super easy to follow as well. Most of the supplies that I used (including Cricut Cartridges) can be found at Scrapyland.com (besides the border strips).
Thanks for Looking!!
Mila
Sunday, November 7, 2010
Thursday, November 4, 2010
Happy Thanksgiving Card


Recipe:
-Graphic 45 Hallowe'en in Wonderland 8 x 8 Paper Pad
-Tim Holtz Bird Cage Die
-Cricut Cartridge Wild Card
-Tim Holtz Walnut Stain Distress Embossing Powder
-Tim Holtz Vintage Photo Distress Embossing Powder
-Tim Holtz Disress Inks in Walnut Stain and Vintage Photo
-Feathers
-Prima Lace
-Tattered Angels Glimmer Mist in Pearl and Tattered Leather
-I-Rock and Bling
I am so excited to share this Thanksgiving card with you that i designed for the SweetSassyDiva blog!! I absolutely love this time of year. You guys will see a ton of fun themed projects throughout the next two months so stay tuned!
The card is sized at 5.5"H x 4.5"T, I cut out the bottom piece of the designed paper at 5.25"H x 4.25"H and the other pieces of the designed paper i kind of just eye balled what looked good to me. I distressed the edges of the design paper with my Tim Holtz edger and then inked over it with Walnut Stain distress ink. I next cut out all of the pieces with my Cricut and Sizzix Big Shot. For the leaves, the scallop layer and the sentiment i used the Wild Card Cricut cartridge (cut out at 6"T) and for the bird cut out i used the Tim Holtz bird cage die (the bird was cut out on medium weight chipboard). Next, I embossed the leaves, the bird and the sentiment with Tim Holtz Distress Embossing powder and then sprayed it with Pearl Glimmer Mist. This gave it an amazing duo color tone. I then finished it off with some Prima Lace and some I-Rock bling.
Hope you like it!!
Feel free to leave a comment and tell me what you think.
Hugs,
Mila
Sunday, October 31, 2010
Halloween Mini Album and Announcement!!
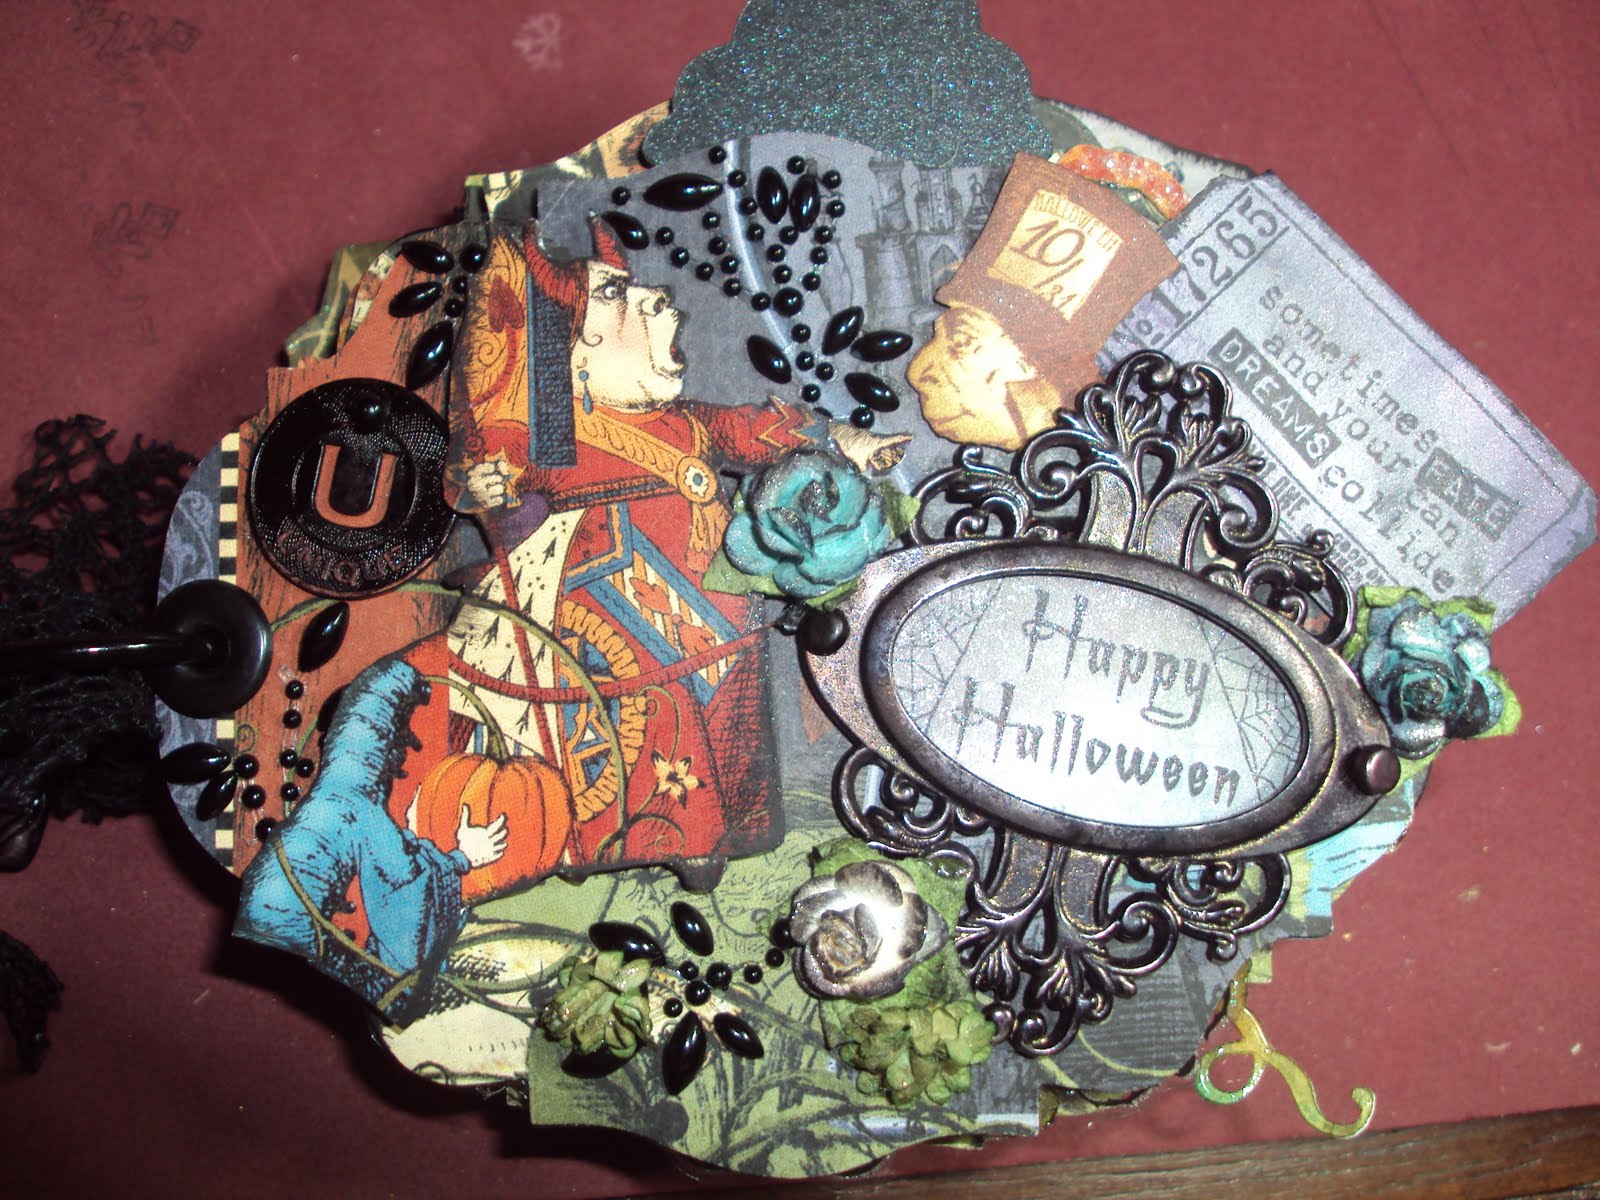 Happy Halloween Everyone! I have an announcement to share with you.... I found out last week that I made the SweetSassyDiva design team. I am so super excited!! This is my first project that I am daybuing on the blog This is a mini album I made for my son using the paper collection by Graphic 45 Hallowe'en in Wonderland. It is so cute!! I just love it!! I glimmer misted all of the pages with Old Lace glimmer mist by Tattered Angels. This is one of my favorite, most used mist. It is almost clear with just a hint of glimmer. Enjoy!
Recipe:
-Tim Holtz Baroque Die
-Sentimentals Cricut Cartridge
-Fabulous Finds Cricut Cartridge
-Happy Hauntings Cricut Cartridge
-October 31 Cricut Cartridge
-Graphic 45 Hallowe'en in Wonderland 8x8 Pad
-Tim Holtz Ornate Plate
-Prima Bling in Black Pearl
-Prima Mini Roses
-Prima Lace
-Tattered Angels Glimmer Mist: Wheat Fields and Old Lace
-Crafty Secrets Alice in Winderland Stamp Set
-Crafty Secrets Halloween Stamp Set
-Tim Holtz Odds and Ends Stamp Set
The first thing i did was cut out 6 pieces of medium weight chipboard and colored the end of each edge with black acrylic paint by Claudine Hellmuth. Then i took the pattern paper and cut that with the baroque die by Tim Holtz as well. For the front cover I used an ornate plate by Tim Holtz and alcohol inked it in black (all of the metal embellishments are inked with black alcohol ink). Next I used a stamp by Crafty Secrets, cut out some of the pattern paper, and of course it could not be complete with out some Prima bling and flowers.
For the second page i used a clear frame I got at Michaels as a pocket to hold some tags. The tags are from the Happy Hautings Cricut Cartridge and they are cut at 3.5"H x 2.47"W


For this next page i used my Cricut Expression and the October 31 Cricut Cartridge ( I just love this cartridge). I cut out the image twice, once the whole image and then the next one i cut out out using the hide / contour feature, then used distress stickles. I used Tim Holtz distress ink on the leaves. I cut the image at 2.01"H x 5.00"W, I cut the tags at 3.5'H x 3.29"W.

The next two pages are pretty simple, I used the Happy Hanutings cartridge to cut out two frames. On the first one i used distress stickles over it and cut it at 4.97"H x 3.64"W, the second one I used Rock Candy Distress Crackle Paint, cut it out at 3.84"H x 4.23"W.

 This was a page I used my most favorite Cricut cartridge of all time... Sentimentals. It is an envelope pocket to hold some tags and pictures. I cut it out at 2.33"H x 6.31"W
 This next page is so super simple, i loved the paper so much i did not want to cover it, so I used another acrylic frame i got from Michaels, it is the Recollections brand.
This next page is very interesting and I just love it. It is a mini album within a mini album. I cut out all of these little playing cards from the collection and then made them into a mini album to hold journaling and photos. I cut out the little tabs using the Fabulous Finds Cricut cartridge. I cut the little tabs at .36"H x .84"W.


This page is for some tags, I cut out the spider web using the Happy Haunting cartridge. The web was cut at 3.59"H x 3.07"W.
 This is another page that I used the Sentimentals Cricut Cartrige on, I cut out this file folder at 3.95"H x 6.89"W

The last page I used the Cricut cartridge October 31 and i cut this piece at 3"H x 4.63"W. I then backed it with some black cardstock so that the words would really show.

Please feel free to down load the file: Alice in Wonderland Mini Milamemories.blogspot.com.gypsy
Share some love and leave me a comment, let me know what you think!!
Hugs,
Mila