
This is my favorite time of year! It’s starting to smell like fall, and I am getting in the mood to make apple pie! I have been slowly starting to look at Halloween decorations and have been getting so inspired I just had to make a few Halloween mini albums for my Etsy store! I have had so much fun making this Vampire mini album. I loved trying to make some of the pages look like they had blood splattered on them!! I just love it!! I glimmer misted all of the pages with Old Lace glimmer mist by Tattered Angels. This is one of my favorite, most used mist. It is almost clear with just a hint of glimmer. Enjoy!
Materials
- Metal Book Plate
- Cricut Expression
- Sizzix Big Shot
- Sentimentals Cricut Cartridge
- Fabulous Finds Cricut Cartridge
- Happy Hauntings Cricut Cartridge
- October 31 Cricut Cartridge
- Prima Bling in Black Pearl
- Prima Mini Roses
- Prima Lace
- Tattered Angels Glimmer Mist: Wheat Fields and Old Lace
- Crafty Secrets Halloween Stamp Set
- Tim Holtz Odds and Ends Stamp Set
- Claudine Hellmuth Black paint
- Stampin Up Crystal Effects
- Tin Holtz Crackle Paint – Rock Candy
- Stampin Up Basic Black and Whisper White Cardstock
The first thing I did was cut out 6 pieces of medium weight chipboard and colored the end of each edge with black acrylic paint by Claudine Hellmuth. Then I took the pattern paper and cut that with the baroque die by Tim Holtz as well. For the front cover I used a metal book plate along with some Martha Stewart die cuts of the vampire and the moon. I stamped the bats and the cat on Stampin Up cardstock, shimmer painted them and then coated them in Crystal Effects. Next, I used a stamp by Crafty Secrets, cut out some of the pattern paper, and of course it could not be complete with out some Prima bling and flowers.

For the second page I used an acetate chandelier die cut as a pocket to hold some tags. The tags are from the Happy Hauntings Cricut Cartridge and they are cut at 3.5″H x 2.47″W

For this next page I used my Cricut Expression and the Happy Hauntings Cricut Cartridge (I just love this cartridge) to cut out the frame. I then used Stampin Up silver embossing powder to emboss the frame. I was going for the look of a frame hanging on the wall. Next, I had an acetate die cut of a chair and scratched up the legs a little bit to give it more of a worn effect. Finally, I wrapped lace around the seat of the chair and then put some bling on it to give it a cool effect.

This is another page that I used the Sentimentals Cricut Cartrige on, I cut out the folder and then I took some lace and distressed it. The picture of the lady is cut from a Graphic 45 collection, “Le Romantique”. I distressed the image and then covered it with Rock Candy Crackle paint by Tim Holtz. For the left side of the page, I scrunched up some vintage lace and hot glued it to the side of the folder, then put some Prima bling behind it to give it some color.

The next two pages are pretty simple; I used the Happy Hauntings cartridge to cut out two frames. On the first one I used distressed Rock Candy Crackle Paint. The second frame I wanted to try something a little different, so I took a paint brush and some silver paint and brushed the frame in a few places. I let it dry, and then put Crystal Effects over it to give it some strength and a super awesome look!


This next page is so super simple, I loved the red paper so much I did not want to cover it so I used another acrylic acetate piece from Martha Stewart. A few tombstone tags give it a great finish!

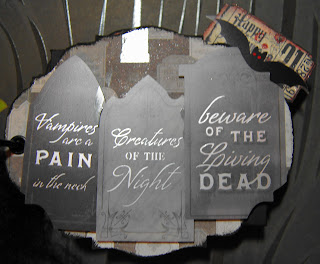
The tombstone tags were so cute and I love the commentary on them, so I decided to make a pocket out of three of them. I used Crystal effects to glue the middle sides together, then I popped up the pocket with some Stampin dimensionals.
This is probably one of my most favorite pages out of the mini album because I love how the frame turned out, and I adore the shape of it! Plus, I got to use some rosettes and more Prima bling (you will see I am an addict when it comes to this stuff LOL)! I cut the frame out using the Happy Hauntings cartridge again, then I took some VersaMark and Cherry Cobbler Stampin Up embossing powder and embossed some splatters of blood. I wanted it to really stand out and look dimensional, so then I took some Crystal Effects and covered the whole frame with it. I love the way it turned out. I then used an adage ticket I had that said the word Twilite on it (yes, I know it is not the same spelling as Twilight the movie – Woohoo Team Edward, but I still thought it was neat!)

This next page is super interesting, I am hoping that my idea in my head (LOL) came across on this page! It is an envelope pocket to hold some tags and pictures, when you open it up, it says “Velcome”, which I cut out using the October 31 cartridge. Let me know what you think about this page!


The second to last page is for some tags. I cut out the spider web using the Happy Haunting cartridge, then I applied Crystal Effects to give it some strength and an awesome shiny look. I then had this acetate die cut of a mask, so I thought I would put some lace behind it and then put some red paint on the lace so it would look like blood in the background.

The last page of the mini album leaves room for my signature on a little adage ticket.

Hope you enjoyed my tutorial! Please feel free to let me know if you have any questions in the comments below!
This mini album is for sale on my Etsy store Milamemories.
Mila what a ghoulishly great little album. Your tutorial was awesome. Great pics and I loved how you wrote your materials in Gothic letters. Too cool! TFS
ReplyDeleteOH MY GOD!! Girl this mini is AMAZING!!!!!!!
ReplyDeleteDana
Danascraftycorner.blogspot.com
What a project! Every page is a surprise! Great job!
ReplyDeleteCarolyn
http://cccscraproom.blogspot.com
It's Great!!! I love Halloween and LOve the Album!! I just bought it on your etsy shop!! I just can't wait to get it!! You put so much work into it I am sure it is hard to even give up!!
ReplyDeleteHugs
Shirley
www.lookatmycutestuff.blogspot.com